Combating the Malicious Use of AI-Powered Image Editing: A Deep Technical Dive
Generative AI is a broad field of artificial intelligence that focuses on creating new content, like images, text, music, or even code. It uses various techniques to learn the underlying patterns and relationships within data and then uses that knowledge to generate new, creative outputs. Within generative AI, large diffusion models such as DALL·E 2 and Stable Diffusion (SD) are known for their ability to produce high-quality photorealistic images and can be used for various image synthesis and editing tasks. However, the ease of use of these models has raised concerns about their potential abuse especially Stable Diffusion due to its open source nature. An organization controls the other proprietary tools like Midjourney and DALL-E and filters potentially harmful content to some extent. But Stable Diffusion made it quite easy for a malevolent actor to download photos of people posted online and edit them maliciously.
How Large Diffusion Models Work:
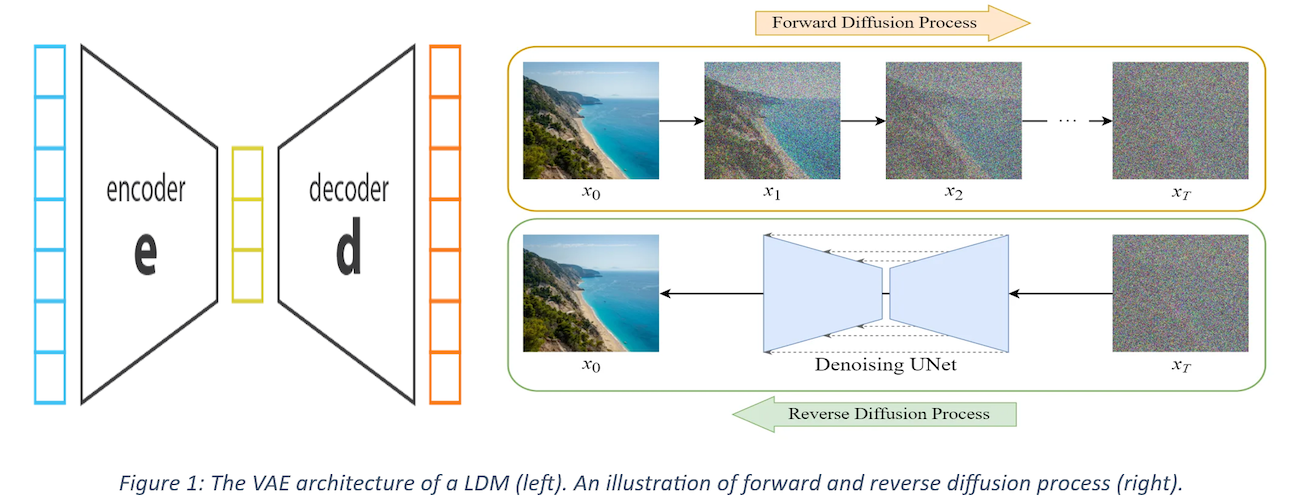
One of the most notable tools like SD in this sector is Latent diffusion models (LDM). These models tackle the large memory requirements of generative models by doing the diffusion in latent space rather than pixel space. Variational Autoencoders (VAE) help convert an image in pixel space to latent space which reduces memory footprint of the image by three (3) times if required. This, along with a stochastic diffusion process, allows image sampling to be viewed as a series of denoising tasks. Given a real image sample, noise is incrementally added to generate new samples. Reversing this process enables new sample generation. LDMs typically generate random samples from their training image distribution but can also be guided using natural language by combining the latent representation with user-defined prompts or images.
Below are three images generated with Stable Diffusion v1.5. The third photo was generated with Stable Diffusion Inpainting model to present a situation that did not happen using the second image as the subject. I will use the generated man in the second image throughout this blog for demonstrational purposes.
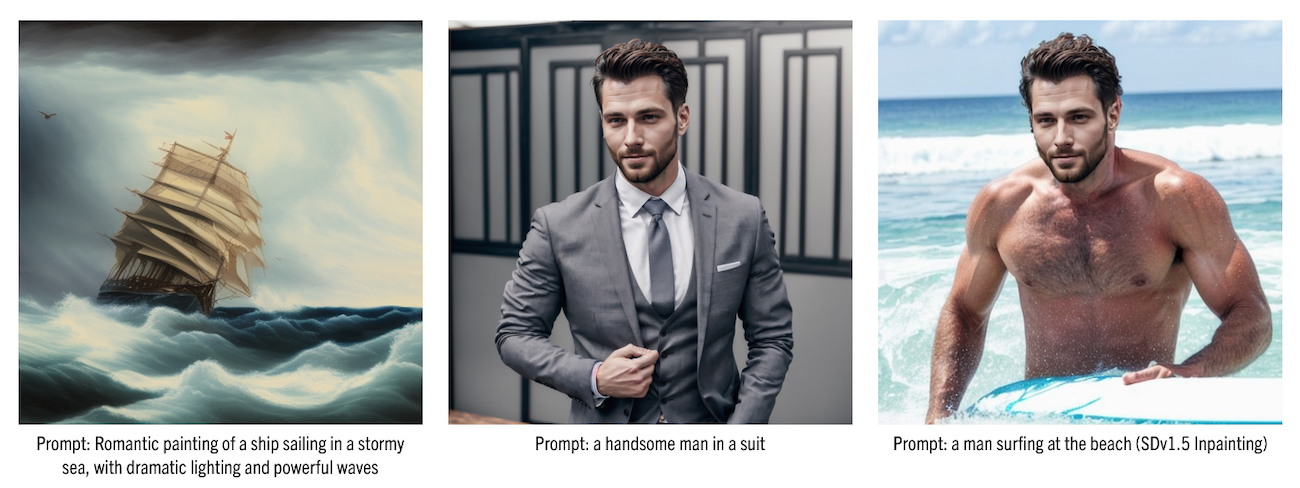 Images generated with Stable Diffusion v1.5 model
Imagine this powerful tool being used for malicious purposes although it is important to recognize that it is, in some sense, impossible to completely eliminate such malicious image editing. Indeed, malevolent actors can still use tools such as Photoshop to manipulate existing images even without diffusion models in the picture, or even synthesize fake ones entirely from scratch. The key new problem is that these actors can now create realistic edited images with ease using large generative models, i.e., without the need for specialized skills or expensive equipment.
Generative AI used for Malicious Purposes
Let’s look at some real-world concerning/disturbing news articles reporting the same issue to understand the gravity of the problem that we as a society are facing today:
-
Teen terror:AI-nudes unleash digital nightmare in Spain as authorities grapple with unprosecutable perpetrators. Devastating psychological impact looms even with fake photos, amplified by social media's permanence and public skepticism. Blackmail specter adds another layer of vulnerability.[1]
-
Grief exploited:Earthquake scammers slither through social media cracks, weaponizing AI-generated imagery and fake charities to fleece distraught donors. TikTok, Twitter, and PayPal turn into hunting grounds for the opportunistic. Be wary of unregistered charities and crypto donation demands.[2]
-
Ethics clash:Amnesty AI under fire for fabricated protest photos in Colombia report. Photojournalists decry the "insult" and potential public mislead. The debate rages: protecting identities vs. sacrificing journalistic integrity and the powerful impact of visual storytelling.[3]
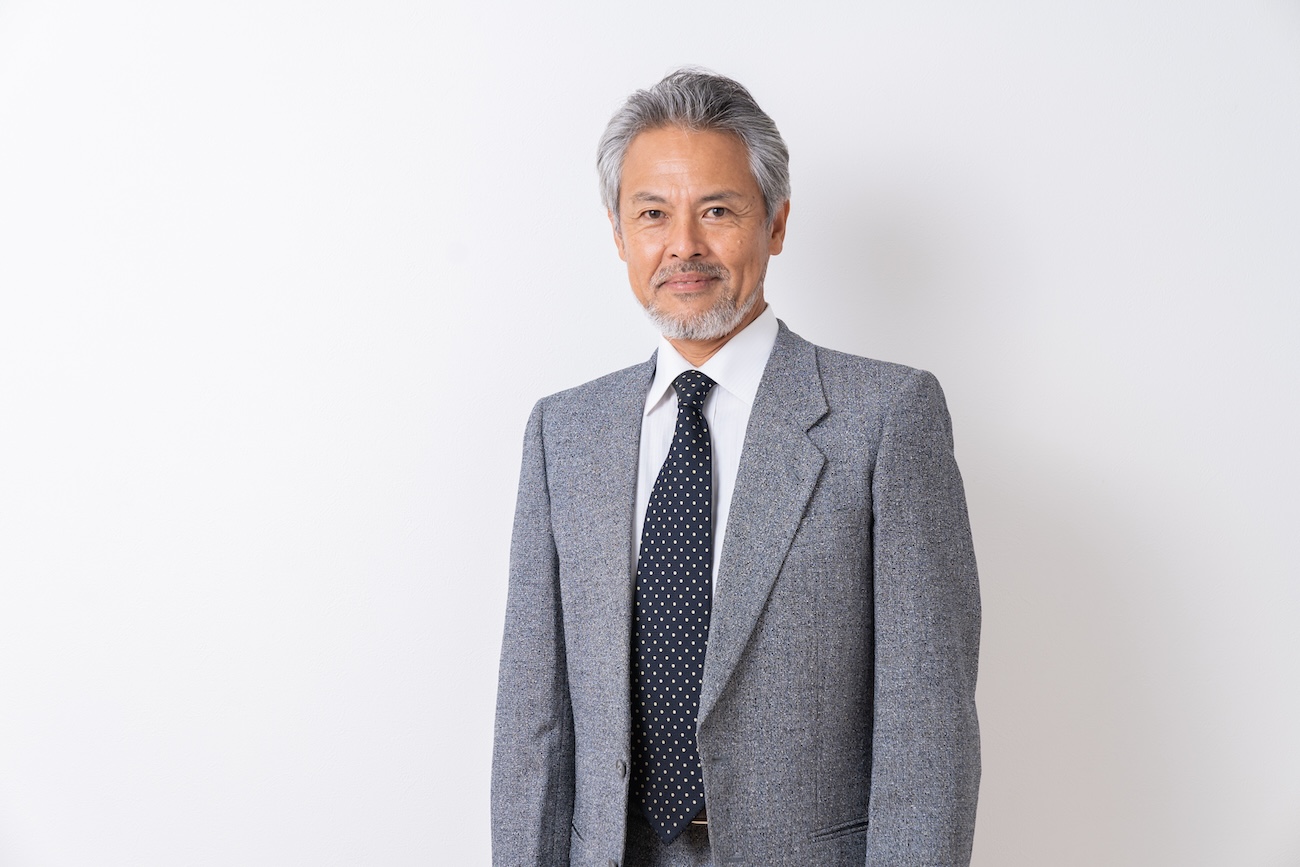
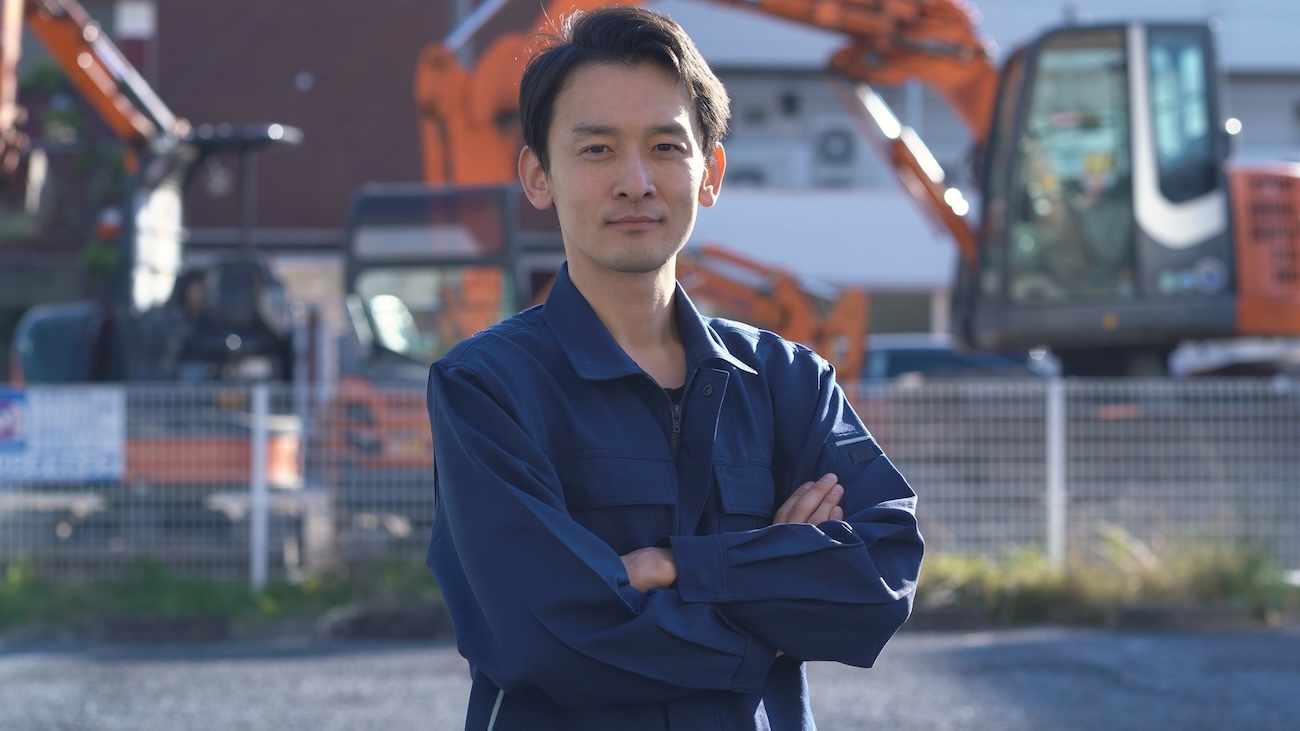
Let’s try to simulate a malicious actor and create a fake image of two people who possibly never met in real life. I will summarize the steps I followed when using the Stable Diffusion:
-
Collected the following two photos from Adobe Stock as the hypothetical victims.
 |
 |
- Generated the desired scenario with some pre-processing steps and prompting. Here are two results from a couple of outputs generated in minutes.
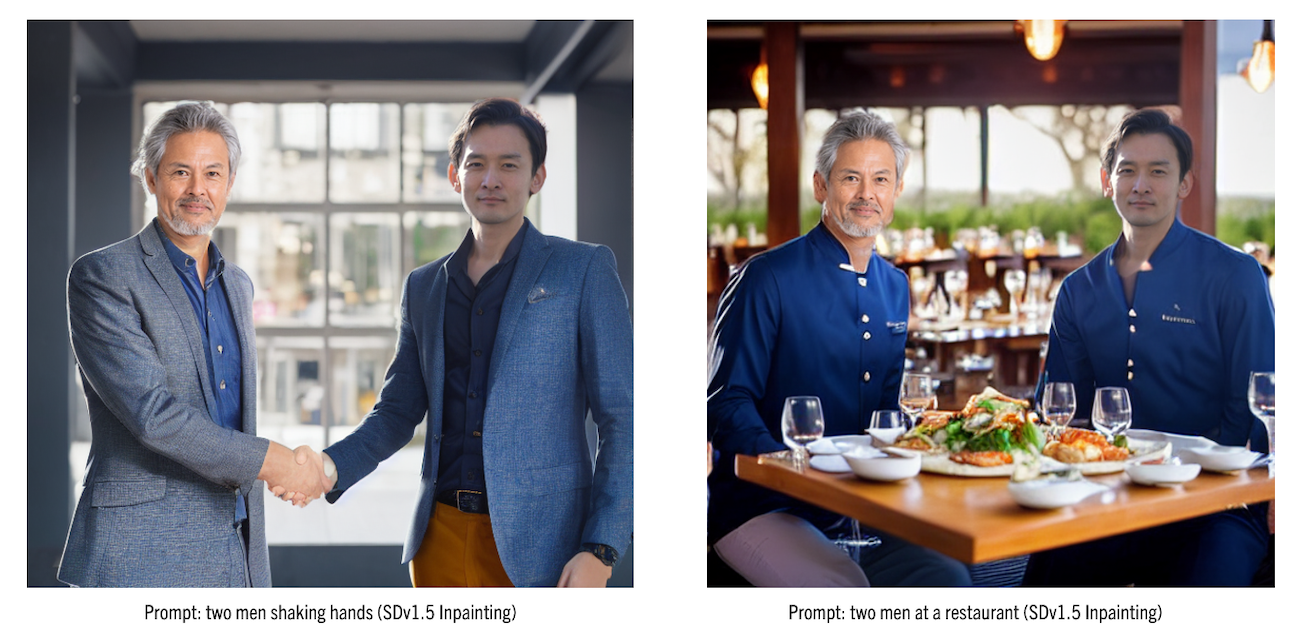
Results from a very simplified process are demonstrated above. More time and better prompting can generate even more realistic images. Imagine this scenario used for political reasons. These scenarios can be used to generate images of a well-reputed person with a bad person to destroy the victim’s reputation. However, a person who has used or is familiar with AI generated images can figure out that it is AI generated. Particularly, most AI generated images have slight imperfections like disproportionate body shape, missing or extra limbs, fingers, imperfect lighting or reflections, and so on. A person without this knowledge can be fooled easily since a photo can make any article more convincing. It should also be noted that the AI image generation field is rapidly growing and the imperfections mentioned are getting less and less observable with each iteration.
What could be the ways to tackle this problem?
If you’re thinking “Oh, if only there were a way to manipulate the image without degrading the quality that would make it impossible to edit“, then you may think about a technique called Adversarial Attack. For a given computer vision model and an image, an adversarial example is an imperceptible perturbation of that image that manipulates the model’s behavior. In image classification, for example, an adversary can construct an adversarial demonstration for a given image x that makes it classified as a specific target label (different from the true label).
Adversarial Attack
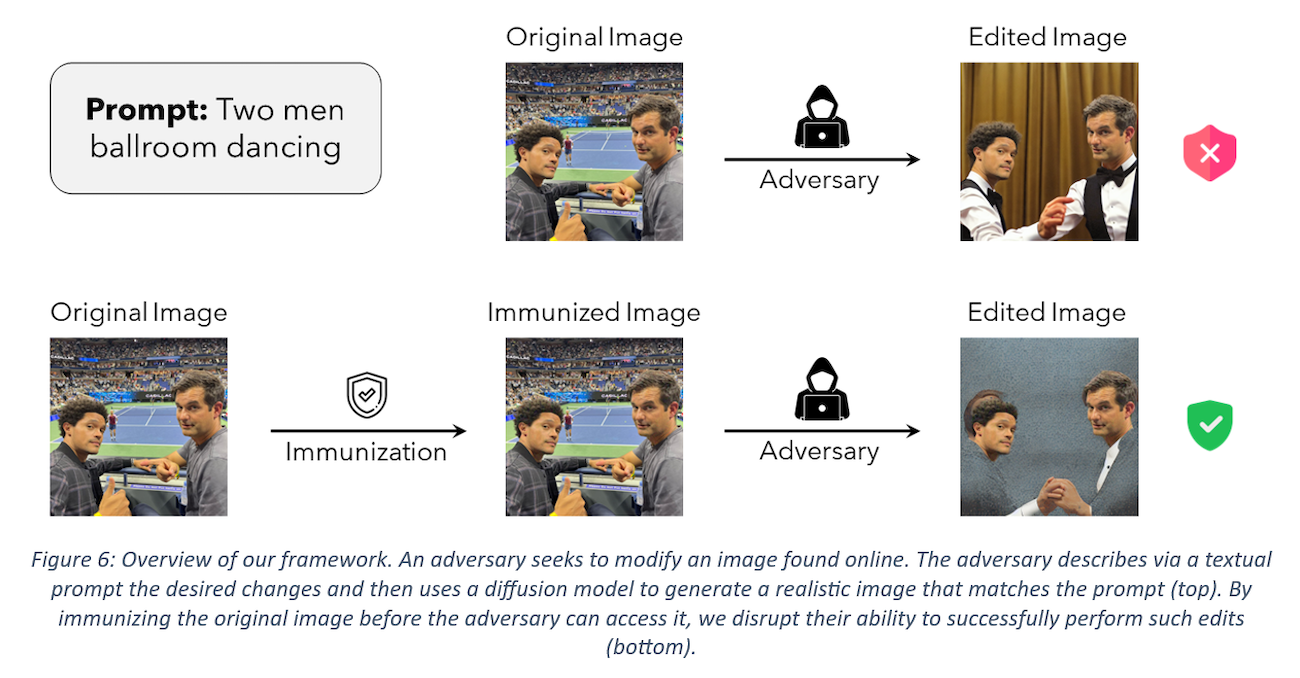
Let’s take a deep technical dive into how Adversarial Attack can help us in this scenario. Fortunately, researchers have already been thinking about this issue and have come up with a possible solution using this technique. This paper Raising the cost of malicious AI powered image editing[4]everages the Adversarial Attack literature to tackle malicious image editing and named their technique PhotoGuard. At the core of this approach is the idea of image immunization—that is, making a specific image resistant to AI-powered manipulation by adding a carefully crafted (imperceptible) perturbation to it. This perturbation would disrupt the operation of a diffusion model, forcing the modifications it performs to be unrealistic (see the picture below – Figure 6, from the paper). In this paradigm, people can continue to share their (immunized) images as usual, while getting a layer of protection against undesirable manipulation. Specifically, they present two different approaches to execute this strategy for latent diffusion models (LDM): an encoder attack and a diffusion attack.
 Overview of PhotoGuard framework. Taken from the paper.
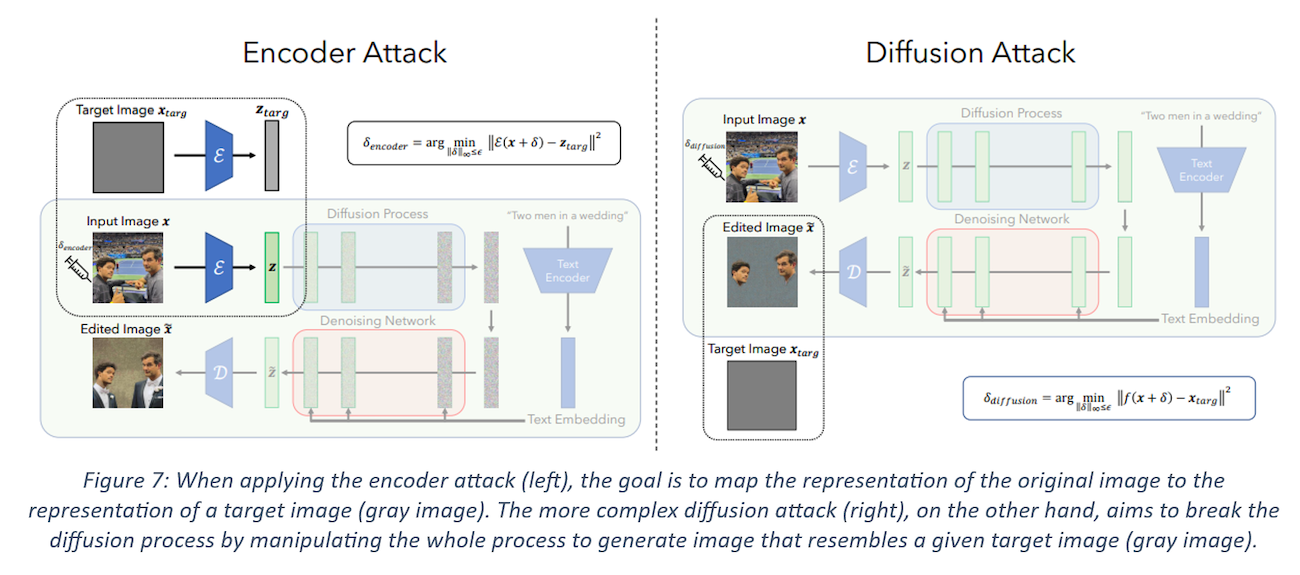
Encoder Attack: I have talked about how an LDM, when applied to an image, first encodes an image using the encoder of a VAE into a latent vector representation, which is used to generate a new image. The key idea behind this encoder attack is to disrupt this process by forcing the encoder to map the input image to some “bad” representation. This is done by solving an optimization problem using a method called Projected Gradient Descent (PGD). PGD is a method used in adversarial attacks to find the optimal perturbations that can be added to the input data to fool the model. In this case, the authors pick a target image (e.g. a uniform gray image) and use the encoded representation of this image as the target representation. The objective of PGD in this problem is to slowly reduce the distance between the encoded representation of the perturbed image and the target latent representation given a fixed number of steps. It is an iterative method that takes steps in the direction of the gradient of the loss function, and then projects the result back into the feasible set (in this case, the set of allowed perturbations). After completing this process, an immunized image is generated which is similar to the (gray) target image from the LDM’s perspective. It should be noted that it is also possible to do the same thing for a specific area of an image which is what we will try out later.
 Overview of Encoder and Diffusion Attack process. Taken from the paper.
Diffusion Attack: Although the encoder attack is effectively forces the LDM to generate images that are unrelated to the immunized ones, we still expect the LDM to use the textual prompt. For example, as shown in the encoder attack diagram above, editing an immunized image of two men using the prompt “Two men in a wedding” still results in a generated image with two men wearing wedding suits, even if the image will contain some visual artifacts indicating that it has been manipulated. It is possible to disturb the diffusion process even further so that the diffusion model ignores the textual prompt entirely and generates an image that looks more obviously manipulated.
The authors can do so by using a more complex attack, one where the target is the diffusion process itself instead of just the encoder. In this attack, they perturb the input image so that the final image generated by the LDM is a specific target image (e.g., random noise or gray image) using the same process with the help of PGD. This attack targets the full diffusion process (which includes the text prompt conditioning) and tries to nullify not only the effect of the immunized image but also that of the text prompt itself. Indeed, in the example no wedding suits appear in the edited image whatsoever.
It is worth noting that this approach, although more powerful than the encoder attack, is harder to execute. Indeed, to solve the above problem using PGD, one needs to backpropagate through the full diffusion process which includes repeated application of the denoising step. This causes memory issues even on a powerful GPU like A100 40GB. To address this challenge, the authors backpropagate through only a few steps of the diffusion process, instead of the full process, while achieving adversarial perturbations that are still effective.
The authors also provided some metrics that measure the effectiveness of their diffusion attack. However, I will not cover that in this article. Feel free to have a look at the paper if you are interested in this.
PhotoGuard in action
I have used the generated subject from before to Inpaint two scenarios shown below and then swapped the input image with an immunized one. You will be able to notice the discrepancies if you take a close look at these images.
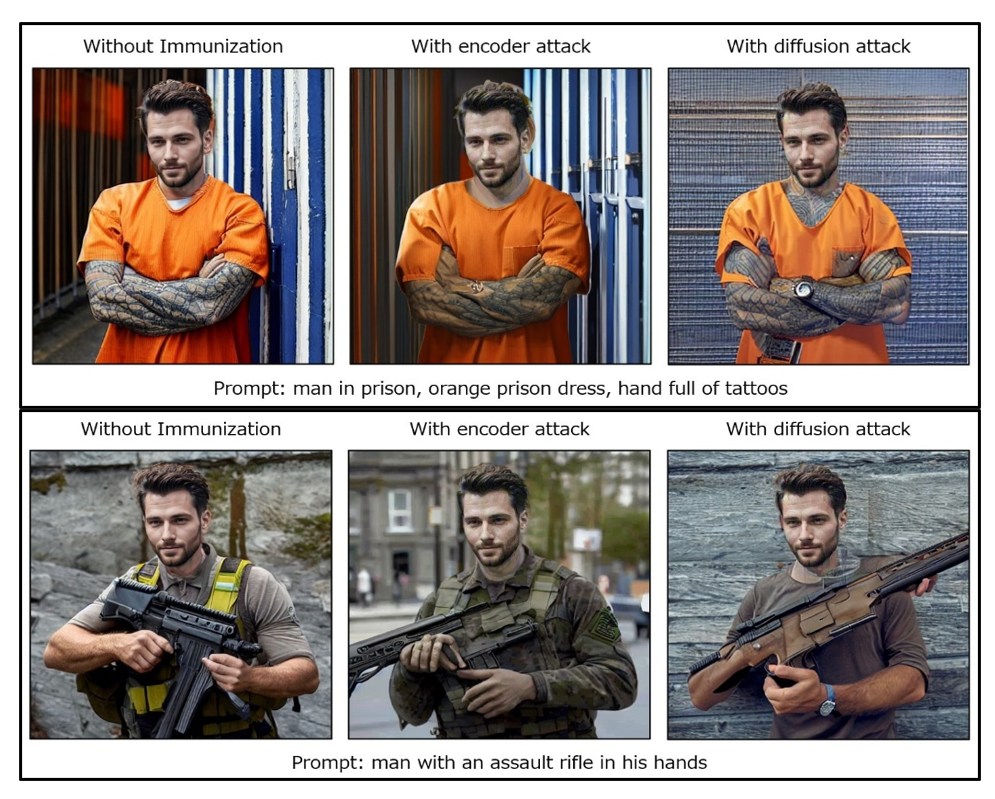
As you can see, the outputs after immunization (especially the diffusion attack) look a lot less realistic when compared to the non-immunized one. All the parameters including the seed value were the same while generating the images. However, in the above examples, I tried my best to get good outcomes from the adversarial attack. This brings me to our next section, which is the caveats of this technique, of which there are many.
Caveats
Of course, no technique is perfect and this one too has some limitations. One of the big caveats for me is that the immunized area is not so imperceptible. In our case, the face after immunization looks like it was manipulated and the quality of the face area was decreased or noise was added. However, it is not so big of an issue if you are not looking for it.
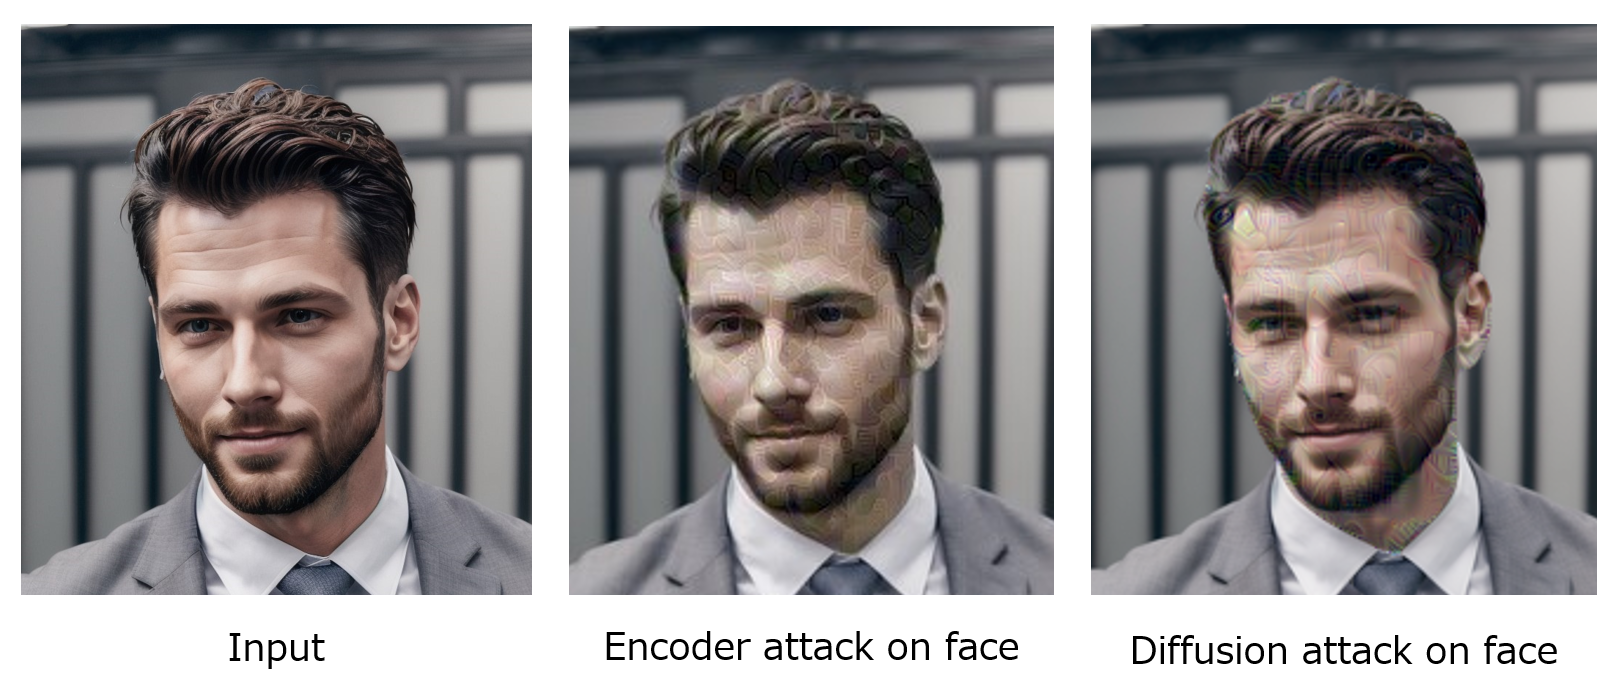 immunized area loses quality and becomes noisy.
There are some issues with the memory requirement and time required to achieve immunization on both types of attacks. For instance, for a 512×512 resolution image, the encoder attack needs about 8GB of GPU memory and takes about 20 seconds on a high-end RTX A6000 48GB GPU. On the other hand, diffusion attack on the same image needs about 15GB of GPU memory and takes roughly 35 minutes to complete. However, this resolution is quite low by today's standards and uncommon. So, I tested how long it would take to immunize a higher-resolution image of 1024×1024 pixels. While the encoder attack took only 1 minute and 20 seconds, it was impossible to run the diffusion attack due to an Out Of Memory error. After reducing the resolution to 896×896, it was possible to run the diffusion attack, but it took 3 hours and 10 minutes to complete. Additionally, the higher-resolution images had a very low immunization effect, meaning they were still easily editable using SDv1.5 Inpainting. It might be possible to increase the immunization effect by running the process for longer, but I didn't want to find out as it already took over 3 hours. Below are the immunization effects of diffusion attack shown side-by-side. The higher-resolution image seems more realistic to me.
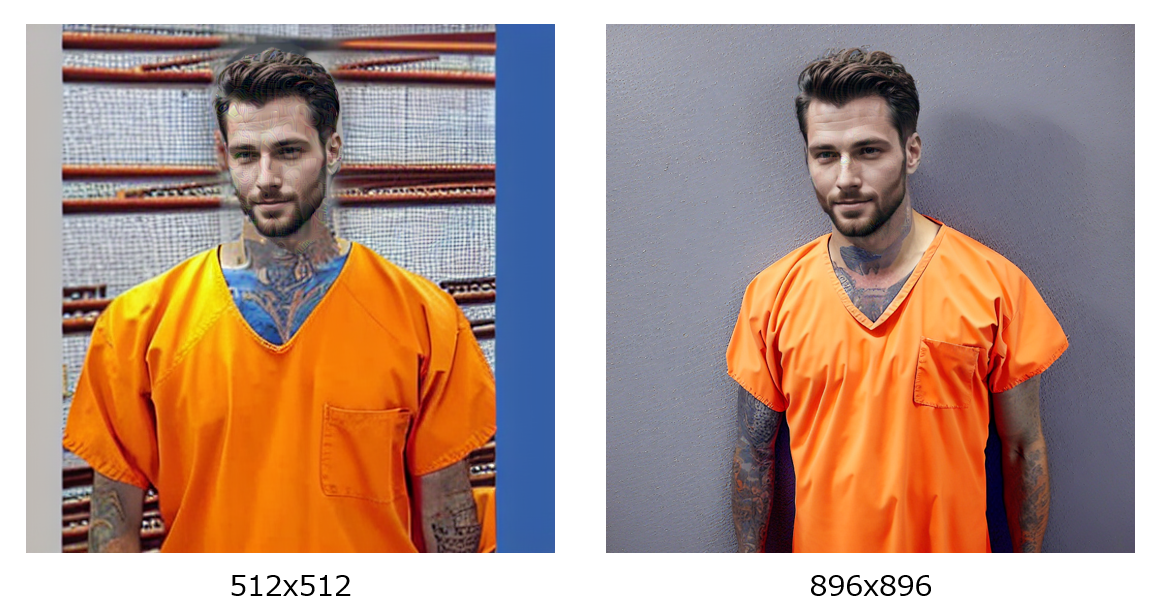 using a higher-resolution image loses the effectiveness
Another thing I noticed is that the encoder attack fails if we try to immunize the desired area (e.g. face) with a more accurate segmentation model like SAM[5].
>>read our blog on this model to get more ideas.
Trying it this way with the prompt “two men shaking hands” we get the following result. This is more convincing to me and shows us the weaknesses of the faster encoder attack technique. The diffusion attack however also loses the effectiveness of immunization but does a bit better in this regard.
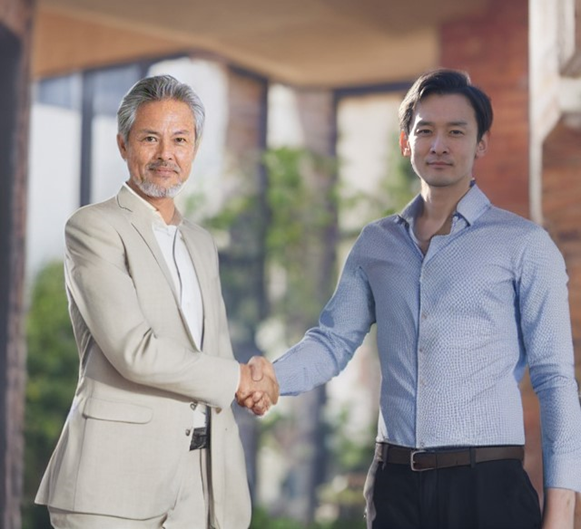 An example of the encoder attack failing to immunize if the mask is accurate
Another big caveat is, this technique is not invariant to image transformations. The technique seemingly fails to achieve immunization if the JPEG quality is less than 95%[6]. It is quite concerning as decreasing quality is a common practice to reduce the storage footprint of an image.
Even with all the limitations mentioned above, this is definitely a step in the right direction. Research is an iterative process. More research on this technique could mitigate the problems by a lot if not eradicate them. So, I am eagerly waiting for more papers on this space.
However, after testing this technique and finding out about its limitations, I started looking for more alternatives. I could not find any other direct approaches like this but could find some potential passive solutions like Invisible Watermarking and Classifying AI generated images. These two techniques would have to be adopted by social media and messaging platforms to have an impact. If it is adopted well, it would be possible to label every image uploaded on social media with “AI Generated“ if detected. This way, images generated with AI would have less value and sentimental impact knowing that it is AI generated. I will share more details on these techniques later if you readers are interested.
【参考文献】
[1]AIが生成した裸の子供の画像がスペインのアルメンドラレホの町を震撼させる
[3]アムネスティ・インターナショナル、AI生成画像の使用で批判を受ける
[4]Raising the Cost of Malicious AI-Powered Image Editing
[5]Segment Anything Model (SAM)
[6]JPEG Compressed Images Can Bypass Protections Against AI Editing


お問い合わせ・
導入のご相談
AI導入や活用についての
ご質問・ご相談はこちらから。
現状の課題やお悩みをもとに、
最適な進め方をご提案します。
資料ダウンロード
調和技研の事業や事例集をご覧いただけます。
AI活用の全体像を知りたい方におすすめです。